Saturday, April 30, 2016

Z is for Zucchini

Z is for Zucchini

So this is the last day for the A to Z Challenge 2016. Been fun as usual and thanks to all of you who have visited me. I have tried to return all visits but one or two of you do not have a working link which I could use.

I did Zebra for the last two challenges so figured I had better change although many of you may not know that zebra is used as a food. Zucchini is called courgette in the UK and France, Zucchini being an Italian name. It is a summer squash which can reach nearly a foot in length but is usually harvested much sooner. I know when we lived in North Carolina we were told, during the season, not to leave our car windows open too wide or we would find the car stuffed with zucchini from which I assume they are a very prolific grower. A friend in NC used to grow them large sized especially for me and I would stuff them as we did with vegetable marrow in England. I don't believe they are the same veg although Wiki seems to think they are. In my memory, they don't taste the same.

People have been figuring out how to cook zucchini forever. This sounded like a pretty good recipe.

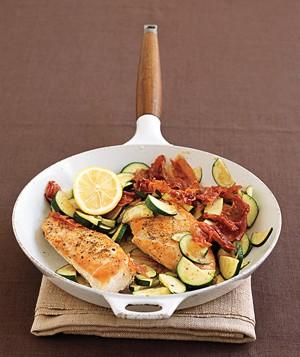
Chicken, Zucchini, and Prosciutto

4 boneless, skinless chicken breasts
1/2 teaspoon kosher salt
1/2 teaspoon black pepper
2 tablespoons olive oil
1/4 pound (about 8 slices) prosciutto
3 small zucchini, thinly sliced into half-moons
1 clove garlic, thinly sliced
1 lemon

1. Heat oven to 400° F. Season the chicken with ¼ teaspoon each of the salt and pepper.

2. Heat 1 tablespoon of the oil in a large ovenproof skillet over medium-high heat. Cook the chicken for 2 minutes per side.

3. Transfer the chicken to the oven and roast for 8 minutes.

4. Meanwhile, in a second skillet, over medium heat, heat the remaining oil. Cook the prosciutto until crisp, 1 to 2 minutes per side. Transfer to a plate.

5. Add the zucchini, garlic, and remaining salt and pepper to the skillet and cook until tender, about 3 minutes.

6. Add the prosciutto and zucchini mixture to the skillet with the chicken, squeeze the lemon over the top, and toss. Divide among the plates.

Serves 4.

Source: Real Simple


Have a great day
 

Friday, April 29, 2016

Y is for Yam Bean

Y is for Yam Bean

I have just discovered Yam Bean is another name for Jicama. Luckily for me. This is some of what Wiki has to say about itThe jícama  or yam bean  is a vine widely grown for its large (10-15 cm diameter and up to 20 kg weight), spherical or elongated taproot. After removal of the thick, fibrous brown skin, the white flesh of the root can be eaten cooked or raw. Crisp, moist, and slightly sweet, the flesh draws comparison with that of the apple. The plant produces seeds that are comparable to lima beans, and that are sometimes eaten when young in places where the jicama is native. The mature seeds contain high levels of rotenone, a chemical used as an insecticide and pesticide. The remainder of the jícama plant is very poisonous. There seem to be different varieties grown in South America all with similarities to one another. I didn't realise the part we eat was actually the tap root nor that the beans can also be eaten although I have never come across them anywhere.

If you are a regular reader, you might know that I love dumplings. They are actually not that difficult to make if you use wonton wrappers. Admittedly I get my dumpling fix at The Mandarin when we go, at Chinese New Year especially when they have lots of different dumplings, but they always have some all year round.


Steamed Pork and Jicama Dumplings

Though these dumplings are traditionally cooked in stacked Asian bamboo or metal steamers, you can also use a pasta pot with a deep perforated colander-steamer insert. If your pot has a second shallow colander-steamer insert, you can steam 2 batches at once. The dumplings should be served
warm, so reheat them in batches as platters need replenishing.


INGREDIENTS

  1. 1 large egg white
    2 tablespoons minced peeled fresh ginger
    1 tablespoon minced garlic
    1 tablespoon peanut or vegetable oil
    1 tablespoon Asian sesame oil
    1 tablespoon soy sauce
    1 tablespoon cornstarch
    2 teaspoons sugar
    1/2 teaspoon salt
    1 cup diced (1/4 inch) peeled jicama
    1/2 cup minced scallion
    1 1/2 pound ground pork (not lean)
    60 wonton wrappers (from two 12- to 14-ounce packages), thawed if frozen
    2 tablespoons black sesame seeds, toasted
    2 tablespoons white sesame seeds, toasted

  1. PREPARATION

    1. Make filling:
      1. Lightly whisk egg white in a large bowl, then whisk in ginger, garlic, peanut oil, sesame oil, soy sauce, cornstarch, sugar, and salt. Add jicama, scallion, and pork and mix together with your hands until combined well.
    2. Assemble dumplings:
      1. Separate wonton wrappers and restack in piles of 10. Cut through each stack with cookie cutter and discard trimmings. Arrange 6 rounds on a work surface (keep remaining rounds covered with plastic wrap) and mound a scant tablespoon filling in center of each. Lightly moisten edge of wrappers with a finger dipped in water. Working with 1 at a time and leaving dumpling on flat surface, gather edge of wrapper around side of filling, pleating wrapper to form a cup and pressing pleats against filling (leave dumpling open at top). Flatten filling flush with edge of wrapper with wet finger and transfer dumpling to a tray. Make more dumplings in same manner with remaining rounds and filling.
    3. Steam dumplings:
      1. Generously oil bottom of colander-steamer insert and bring a few inches of water to a boil in pot so that bottom of insert sits above water. Arrange 10 dumplings, about 1/2 inch apart, in insert and steam over moderate heat, covered, until dough is translucent and filling is just cooked through, about 6 minutes.
      2. Stir together black and white sesame seeds and sprinkle over dumplings. Serve immediately.
    Cooks' note:
    ·Dumplings (without sesame seeds) can be formed and steamed 1 day ahead and cooled completely, then chilled, covered. Steamed dumplings can also be frozen 1 week; freeze in 1 layer on a plastic-wrapped tray until hardened, then transfer to a sealable plastic bag. Reheat (do not thaw if frozen) in colander-steamer insert over simmering water (over low heat) until heated through, about 6 minutes.

Have a great day
 

Thursday, April 28, 2016

X is for Xocolatl

X is for Xocolatl


Xocolatl According to the Merriam Webster Dictionary, the English word chocolate is derived from the Spanish word for it, which was derived from the Aztec language Nahuatl. In Mexican pre-Hispanic traditions, the Aztecs prized cacao beans and used them as currency as well as food for the upper class men. They transformed cacao into a beverage called Xocolatl, which later came to be known as "chocolate." How could I not use this food when Chocolate features in my blog title and I am a chocoholic bar none. I wish I could indulge in more chocolate but if I did, I would be the size of two or even three houses with a couple of elephants thrown in. This is supposed to be a short blog so I will not go through the transition from the bean to the chocolate we know and love, but if you are interested, there is an article here which explains how it is done. One of the things I have always wanted to do is to visit a real chocolate maker. Not just one that makes chocolates from bought chocolate, but a place that actually makes the chocolate from scratch.

You may have noticed, there are quite a few recipes out there which include chocolate in one way or another. Although I have recently posted it, Chocolate Volcanoes or Warm Chocolate Pudding is one of my favourites and is extremely chocolatey. Of course, as I said before, I buy them from our local grocery store these days. They are not as good as home made mind you, but an excellent dessert none the less.

Warm Chocolate Cake (Volcanoes)

6 oz Bittersweet Chocolate
2/3 cup unsalted butter
1/3 cup sugar
6 egg yolks
3 egg whites
1/3 cup all purpose (plain) flour

1. Preheat oven to 425°F (220°C). In heavy pot on low heat, melt chocolate and butter together. Cool slightly.

2. Beat together sugar and egg yolks with electric mixer until thick and creamy, about 4 mins.

3. Pour in chocolate mixture and beat together for 5 mins.

4. In a separate bowl, beat egg whites until stiff peaks form, about three mins. Fold into mixture along with flour.

5. Pour into 6 nonstick buttered moulds or non-stick muffin tins (we use cocottes or ramekins). Bake for 5 to 7 mins or until edges are just cooked and centre is still liquid. Cool for 5 mins in cooking dish. Carefully remove to serving dishes. Serve with lightly whipped cream

Freeze, uncooked, overnight or up to 2 weeks if you wish

Preheat oven to 425°F (220°C). Take ramekins out of freezer and remove plastic wrap. Bake volcanoes for 18 minutes - no longer! Cool on rack for 5 minutes. The outsides will be crusty and the centers will be gooey - sort of like your average volcano.

Servings: 6

Source: Food & Drink


Have a great day
 

Wednesday, April 27, 2016

W is for Witlof

W is for Witlof

Known as Witlof in Australia, it's also called Witlof Chicory and French or Belgian Endive. Witlof is a form of radicchio of a similar shape. It is produced by removing the young plant from the ground, trimming its roots and top and replanting it under sand in darkness until it produces a tight, anaemic-looking spear. Witlof is used a lot in Europe and I have Dutch friends who make a big specialty of preparing it. I enjoy it many ways, particularly in salads or as an hors d'oeuvres as shown in the recipe below. I am posting two recipes today because the Endive boats has appeared on this blog once or twice over the years and though delicious is not particularly different any more. It is,  however, a favourite of ours and we have often taken it to parties.

Endive Boats

1/2 Red or green pepper finely chopped

1/2 cup radishes finely chopped
1/2 cup carrot peeled & grated
2 Tbs shallot finely chopped
2 oz feta cheese, finely crumbled
1/4 tsp black pepper
1/8 tsp salt
2 Tbs snipped fresh dill
1 Tbs lemon juice
1 Tbs olive oil
2 endives (20 leaves)
sprigs of dill for garnish

1. In a medium bowl combine first 8 ingredients - through dill - in another bowl whisk lemon juice and oil. Pour over mixture, stir to combine.


2. Spoon 1 tbs of filling into bottom 2/3 of each leaf. Garnish with small sprig of dill.

The recipe below is Australian and I assume by continental parsley they mean Italian or flat leaf.

Witlof braised in white wine

40 g butter

2 tsp olive oil
2 garlic cloves, thinly sliced
4 large witlof, halved lengthways
160 ml (2/3 cup) dry white wine
Chopped fresh continental parsley, to serve

1. Step 1

2. Heat the butter and oil in a large frying pan over medium heat. Add the garlic and stir-fry until aromatic. Add the witlof, cut-side down. Cook, turning occasionally, for 5 minutes or until browned.

3. Step 2

4. Add the wine and season with salt and pepper. Cover and simmer for 6-8 minutes or until tender.

5. Step 3


6. Transfer the witlof to a serving dish. Pour over the wine mixture and sprinkle with parsley to serve

Have a great day
 

Tuesday, April 26, 2016

V is for Vanilla

Although we might call them vanilla beans, the “beans” we use to Vanilla Orchidcreate vanilla flavouring for food are actually seed pods. These seed pods are the fruit of plants in the genus Vanilla which is within the family Orchidaceae; vanilla is just a very delicious form of orchid flower. The most widely grown and used variety in the world is Vanilla planifolia. The V. planifolia species originated in Central America and is now grown
vanilla Bean and Flowerthroughout the region (primarily in Mexico) and Madagascar.

The plant is a vine and can grow up to 300 feet tall, but when commercially cultivated the vines are carefully contained and grown laterally to make them more accessible to workers both for ease of harvesting and hand pollination (a necessary step given the low natural pollination rate of the plant).

To obtain the strongest flavour cut open the “bean” and scrape out the seeds.

Of course there are thousands of recipes using vanilla, but being a chocoholic this is one which appealed to me.

Double Chocolate Pie
CORWYNN DARKHOLME

"Rich and chocolaty, a truly sinful pie! Chocolate fans will love it! Garnish each slice with whipped topping."


Ingredients


1 (9 inch) pie crust, baked
1 1/2 cups white sugar
1/3 cup cornstarch
1/2 teaspoon salt
3 cups milk
3/4 cup semisweet chocolate chips
2 (1 ounce) squares unsweetened chocolate, chopped
4 egg yolks, beaten
1 tablespoon vanilla extract

Directions

Combine sugar, cornstarch, and salt in a 2-quart saucepan. Stir in milk gradually. Add chocolate chips and unsweetened chocolate. Place over medium heat, stirring constantly, until mixture thickens and boils. Boil and stir 1 minute.Place egg yolks in a medium heatproof bowl. Gradually pour half of chocolate mixture into egg yolks, whisking constantly.
Whisk egg yolk mixture back into mixture in saucepan. Place over medium heat and bring back to a boil, stirring constantly. Boil and stir 1 minute. Remove from heat; stir in vanilla extract.
Pour mixture into baked pie shell. Press a layer of plastic wrap onto filling. Refrigerate at least 4 hours but no longer than 48 hours. Remove plastic wrap before serving and top with whipped topping.

Have a great day


Monday, April 25, 2016

U is for Ugli

U is for Ugli


The Ugli fruit, now available in most stores, is from Jamaica and is a blend of grapefruit (or pomelo) orange and tangerine. From what I read, it appears to be natural not something created by man unless I am misunderstanding the matter. It was found growing wild and is mainly grown in Jamaica still. The company, Cabel Hall Citrus Limited which exports them, owns the registered trade name Ugli. I have seen these fruit but have never tried one. These days, because I am on a statin, I am not allowed to eat grapefruit which makes me think Ugli would also be on the banned list.

This sounds like a good recipe. In fact there is a website for Ugli fruit which is where I got it from.

Caribbean Pork Casserole (Serves 4-6)

Ingredients: 


3 tbsp sherry
1½ lb (650 g) pork, trimmed and diced
1½ tbsp oil
8 - 10 shallots, peeled
4 oz(100g) button mushrooms, wiped
¼ cup flour
1½ cups chicken broth
1 medium UGLI® tangelo peeled and cut into segments
Salt and freshly ground pepper
1 bay leaf 

Marinate the meat in the sherry for 2 hours. Heat the oil in a saucepan and gently fry the pork for 3-4 minutes. Add the shallots and mushrooms and cook for further 2 minutes. Sprinle on the flour and cook for 1 minute. Add the broth and seasonings. Simmer, covered for about 1½ hours gently or until tender. Half way through the cooking add the UGLI® tangelo segments. Garnish with fresh herbs and serve with cooked noodles or other pasta.


Have a great day

Saturday, April 23, 2016

T is for Tofu

T is for Tofu

I guess I have used Tofu recipes twice, sorry about that.

Tofu is made from the curds of soy milk which have been coagulated and are then pressed to make into squares of Tofu. It originated in China some 2,000 years ago, ascribing, in legend, its invention to Prince Liu An (179-122 BC) and is one of the healthiest foods you can eat. Because of soy, Asian women do not suffer from menopause problems as Western women do because of their high consumption of soy. It is also a good diet food if you wish to lose weight as it is low in calories and pretty high in protein. A very useful food too because it can be used as a protein source in any dish as it absorbs the flavours of the dish to which it is added. I know not everyone in the west enjoys it, personally I like Tofu and it is a great ingredient in my beloved Hot and Sour Soup. When you buy it, you can purchase firm, medium or soft Tofu depending on what you use it for.


Penang-Style Pork with Soft Tofu


SERVINGS: 4


Chef Cathal Armstrong packs this deeply flavorful, very spicy curry with tender pork and tofu and tops it with crispy garlic.

INGREDIENTS

SPICE PASTE
1 teaspoon coriander seeds
1 teaspoon cumin seeds
1/4 teaspoon ground mace
1/8 teaspoon ground cardamom
1/2 teaspoon kosher salt
1/2 teaspoon black pepper
1 1/2 tablespoons Korean chile flakes (gochugaru)
1 tablespoon minced peeled fresh ginger
1 tablespoon minced shallot
1 tablespoon finely chopped lemongrass, tender inner bulb only
2 teaspoons finely grated lime zest
2 garlic cloves, chopped
1/2 teaspoon Asian shrimp paste (see Note)

CRISPY GARLIC
Canola oil, for frying
3 garlic cloves, thinly sliced

PORK CURRY
12 ounce pork tenderloin, sliced crosswise 3/4 inch thick
Kosher salt
Pepper
1 tablespoon minced peeled fresh ginger
1 tablespoon minced garlic
2 tablespoons minced shallot
1 teaspoon minced Thai chile
1 1/2 cups low-sodium chicken broth
6 tablespoons prepared Penang curry sauce
3 tablespoons soy sauce
2 tablespoons cornstarch mixed with 2 tablespoons water
8 ounces soft tofu, cut into 1/2-inch dice
Steamed jasmine rice, for serving
Cilantro, for garnish


HOW TO MAKE THIS RECIPE

MAKE THE SPICE PASTE In a spice grinder, pulse the coriander and cumin until coarsely ground; transfer to a food processor. Add the remaining ingredients and puree until 
a smooth paste forms.

MAKE THE CRISPY GARLIC In 
a nonstick skillet, heat 1/4 inch of canola oil. Add the garlic and fry, stirring, until golden and crisp, about 1 minute. Using a slotted spoon, transfer the garlic to a paper towel–lined plate to drain. Pour off all but 2 tablespoons of the oil in the skillet.

MAKE THE PORK CURRY Season the pork with salt and pepper. Cook in the skillet over moderately high heat, turning once, until browned, 2 minutes per side. Transfer the pork to a cutting board and quarter each slice. Add the ginger, garlic, shallot, chile and spice paste to the pan and cook over low heat, stirring, until very fragrant, about 5 minutes. Add the broth, curry sauce and soy sauce and bring to a simmer. Whisk in the cornstarch slurry and bring to 
a simmer, then add the pork 
and tofu and cook just until the sauce thickens, 2 minutes.
Spoon rice into bowls and top with the curry. Garnish with the crispy garlic and cilantro.

MAKE AHEAD

The spice paste can be refrigerated overnight.

NOTES
Southeast Asian shrimp paste is made with fermented ground shrimp. Look for it at Asian markets.


Have a great day
 

Friday, April 22, 2016

S is for Swiss Cheeses

S is for Swiss Cheeses

Gruyère
Emmental
Real Swiss Cheese is very different from the generic cheese sold in North America as Swiss Cheese. One of the best known is Gruyère which is a hard yellow cheese named after Gruyères in Switzerland, it is at the foot of the pre Alps. Gruyère is sweet but slightly salty, with a flavor that varies widely with age. It is often described as creamy and nutty when young, becoming more assertive, earthy, and complex as it matures. When fully aged (five months to a year) it tends to have small cracks which impart a slightly grainy texture. I have never been to Switzerland, but Matt has and from all the stories I have heard, he pigged out on the local cheeses. Another one is Emmental which is also a yellow cheese but not so hard. Both of them are good cheeses to use for fondue. I have three fondue pots and haven't used them in a while. Not sure why, it is one of my favourite ways of eating.

This looks an excellent recipe but I am not quite sure why they use spreadable cheese too. Seems somewhat odd.


Martha's Cheese Fondue Sauce


This amount of sauce will serve 4 people as the main course. If you only intend to have fondue as
part of a bigger meal, adjust the amounts accordingly.

1 garlic clove
50ml / about 1/4 cup kirsh
2 tsp. cornstarch
400 g / a bit less than 1 lb Gruyère cheese (aged at least 8 to 12 months), shredded
400g / a bit less than 1 l Emmenthaler or Vacherin Fribourgeois cheese, shredded (Please use real Emmenthaler. A generic 'Swiss Cheese' will not do. Note that in Switzerland you can buy bags of pre-shredded mixed cheese called "Moitié-moitié", meaning 'half and half'.)
1 piece of 'spreadable' cheese, e.g. Laughing Cow/La Vache Qui Rit (not the mini-Babybel type, the triangular foil-wrapped soft gooey double-creme type)
3 dl / 1 1/4 US cups of young slightly sour white wine such as Chasselas or Sauvignon Blanc

In Switzerland, only bread is dipped into the cheese. Any kind of bread with a sturdy crust and a fairly robust crumb is good: a decent baguette, any kind of 'artisan' bread. Note all the pieces should be cut so they each have a side with crust.


Rub the inside of the fondue pot with the garlic clove. Discard the garlic. (This optional step adds a little extra flavor to the sauce.)

Dissolve the cornstarch in the kirsch. Set aside.

Put the fondue pot on a medium-heat. Add the wine and cheeses. Heat while stirring, until the cheeses melt. Add the kirsch and keep stirring until the sauce is smooth and bubbly. This takes about 20 minutes.

Now, set up your fondue pot stand and burner and transfer the pot to the stand. The burner flame (or tabletop cooker) should just be hot enough that the sauce stays how and just sort of seething on the surface. Any hotter and the cheese will burn on the bottom.

Take a piece of bread, and spear it firmly on the fork so that the crust is on the outside. You can optionally lightly dip it in kirsch at this stage.
Have a great day
 

Thursday, April 21, 2016

R is for Rhubarb

R is for Rhubarb

Most people are familiar with this plant which although in actual fact a vegetable, has been declared a fruit in the US. Reading up on it I was reminded that as kids we were often given a stick of rhubarb which we dipped in sugar and ate as a sweet or candy. It is an excellent food to assist in the relief of constipation. In laboratory tests it has also been found to contain parietin which in experiments has slowed the growth of cancer cells in mice and may even work for lung cancer.

I personally love rhubarb but Matt doesn't like it. We had a plant in our back yard in the first house we owned in Canada and it was eventually pulled up because I couldn't be bothered to cook it just for me. Nowadays, once in a while, I buy it from the local asparagus farm and cook it in a very little water, adding sugar and some ginger. 1lb does me for a couple of days. As most people are aware, the leaves are poisonous. I am looking forward to getting some by the end of this month. Although we had a lot of snow at the beginning so I hope it hasn't retarded the growth of either the rhubarb or the asparagus.

There are, of course, hundreds of rhubarb recipes, but this one from Chatelaine appealed to me today.

Rhubarb-buttermilk tea cake

Try this fresh Rhubarb-buttermilk tea cake recipe as a creative alternative to banana bread.

1 1/2 cups all-purpose flour
1 tsp baking soda
1/4 tsp salt
1 egg
1 cup brown sugar
1/2 cup buttermilk
1/4 cup vegetable oil
1 tsp vanilla
2 cups chopped rhubarb
1/2 cup chopped pecans
FOR GLAZE:
1 cup sifted icing sugar
4 to 5 tsp lemon juice

1. Preheat oven to 350F. Lightly spray bottom of an 8 × 4-in. loaf pan.

2. Stir flour with baking soda and salt in medium bowl. Whisk egg with brown sugar, buttermilk, oil and vanilla in large bowl, then stir in flour mixture. Add rhubarb and pecans and stir just until combined. Scrape batter into prepared pan.

3. Bake in centre of oven until a cake tester inserted in centre of loaf comes out clean, 70 to 75 min. Transfer to a rack to cool in pan for 10 min.

4. Stir icing sugar with lemon juice in a small bowl, adding juice 1 tsp at a time until thick and smooth. Drizzle glaze over warm loaf, letting it run down the sides.

5. Crunchy pecans and tangy rhubarb make this moist banana-bread alternative addictively good.

Servings: 8

Substitution Tip:

You can use frozen rhubarb instead of fresh – just thaw it completely before adding.

Storage Tip:

Refrigerate up to 3 days or freeze up to a month.

Source: Chatelaine

Have a great day

Wednesday, April 20, 2016

Q is for Quinoa

Q is for Quinoa

Quinoa is a grain but is not a true cereal. It has become very popular these days and can be used in a wide variety of dishes, in fact it can substitute for rice in any dish. The greens of the quinoa plant can also be eaten but they are not widely available. Oddly enough it is related to beetroot, spinach and tumbleweeds. A connection I would never have made. According to Wikipedia, Quinoa originated in the Andean region of PeruBoliviaEcuadorColombia and Chile, and was domesticated 3,000 to 4,000 years ago for human consumption in the Lake Titicaca basin, though archaeological evidence shows a non-domesticated association with pastoral herding some 5,200 to 7,000 years ago. I guess it's been around a very long time so it's odd that it has only appeared in our stores in recent years, I confess I have only ever used it in a salad recipe. Not really sure why I haven't used it for other dishes. By the way, it is pronounced KEEN Wa.

I was going to give the recipe I have used, but I have posted it a couple of times before. This looked good to me. The recipe tells you to wash the quinoa. The packets I have used do NOT tell you to do that so I would be careful what I was buying if I were you.


Beet, Blood Orange, Kumquat, and Quinoa Salad


My Recipes.com
4 servings

This hearty grain salad featuring blood orange sections, beets, kumquats and avocado is brimming
with rich colors, textures, and nutrients from the vitamin- and protein-packed ingredients.


Ingredients

DRESSING:
1/4 cup finely chopped green onions
2 teaspoons grated blood orange rind
1 teaspoon grated lemon rind
2 tablespoons blood orange juice
1 tablespoon fresh lemon juice
2 teaspoons finely chopped cilantro
1/4 teaspoon salt
1/4 teaspoon ground coriander
1/4 teaspoon ground cumin
1/4 teaspoon paprika
3 tablespoons extra-virgin olive oil
SALAD:
1 cup uncooked quinoa
1 3/4 cups water
1/2 teaspoon salt, divided
1 cup blood orange sections, chopped (about 4 medium)
1 cup diced peeled avocado
whole kumquats, seeded and sliced
medium beets, cooked and cut into wedges


Preparation

1. To prepare dressing, combine first 10 ingredients in a medium bowl, stirring with a whisk. Gradually add oil, stirring constantly with a whisk. Set aside.
2. To prepare salad, place quinoa in a fine sieve, and place sieve in a large bowl. Cover quinoa with water. Using your hands, rub grains together for 30 seconds; rinse and drain. Repeat procedure twice. Drain well.
3. Combine 1 3/4 cups water, quinoa, and 1/4 teaspoon salt in a medium saucepan; bring to a boil. Cover, reduce heat, and simmer for 10 minutes or until liquid is absorbed. Remove from heat; fluff with a fork. Combine quinoa, remaining 1/4 teaspoon salt, blood orange sections, avocado, and kumquats in a large bowl, tossing gently to combine. Add dressing; toss gently to coat salad. Spoon 1 cup salad onto each of 4 plates; top each serving with about 1/2 cup beets.
Have a great day
 

Tuesday, April 19, 2016

P is for Pumpkin

P is for Pumpkin

When I first came to live in Canada I couldn't believe the only use for pumpkin was in a very sweet dessert which I personally did not enjoy. They are classified as a squash and are native to North America although it is certainly available in Europe. The first time I ate pumpkin was in Malta. The yacht club had a barbecue/party on the roof of their building and one of the featured foods was pumpkin soup served in a pumpkin skin which acted as an insulator keeping the soup warm. I have since made pumpkin soup for many years and have certainly copied the idea of serving it in the pumpkin shell at parties. In the late fall, it is a vegetable that is seen almost everywhere in North America both for carving and installing lanterns for Hallow E'en and for making pumpkin pies. Meanwhile I make pumpkin soup.

The following recipe I have used for many years although I see there are many different soup recipes today as well as curries and such.

Pumpkin Soup - Time Life

1/2 oz butter
2  Tbs finely chopped onion
2 Cups cooked Pumpkin
1 UK pt  chicken stock
1 UK pt Half and half
1/8 tsp ground cloves
1/2 tsp sugar
1 tsp lemon juice
2-3 drops Tabasco
1/2 tsp salt

1. If using fresh pumpkin, cook it til mushy. If using canned, drain.

2. In a heavy 5 pt. saucepan, melt butter over mod. heat. When the foam subsides cook onion for 2 to 3 mins, stirring, until they are transparent but not brown. Add the pumpkin, stock, cloves, sugar,. lemon juice, Tabasco and salt. Stir thoroughly to blend all the ingredients

3. Bring to a boil, then reduce heat to its lowest point and cook the soup, stirring occasionally, for 15 mins. Then purée the soup. Stir in the half and half and return the soup to a pan to reheat without boiling. Taste for seasoning.

4. Can be garnished with croutons and served hot, or served chilled with slices of chilled, peeled orange.

Servings: 4


Source: Time Life US

Have a great day